So have fun with digital images without investing lots of money in coloring tools and time!
Now . . . to the first lesson. My goal today is to get a digital image colored in less than 5 minutes. My time - 4 minutes! How can you beat that? Coloring using this technique is basic . . . no shading or blending. But still a fun image - and we'll learn to blend and fade in future tutorials.
For this tutorial, I am using 2 Cute Ink's Best Fins image. This is the first finished product. The steps I took to color the image in less than 5 minutes (as well as additional card samples) are below.
 |
| Original Image |
 |
| Cropping Image |
 |
| Cropped Image |
 |
| Color Palette |
- Open your digital file.
- The first thing I like to do is crop the image. Use the Crop tool to create a box around the image . . . I like to crop as close to the image as I can so when I resize it for cards, I know exactly what size I'm printing. Click the green checkmark on the bottom right of your image to complete the crop.
- The next step is to select colors - and begin coloring your digital image. The icon for Set Foreground Color is red in my photo - it may be a different color in your program. Double-click on the top square and a color palette will appear.
- Notice the "rainbow" bar in the middle of the color palette. Click on the base color you are interested in using. The square with a spectrum of colors will appear. Click on the color you want to use to set the foreground color for the first part of your image. In my case, I chose a yellowish-orange for the daddy fish's body. Click on OK to change your paint "can".
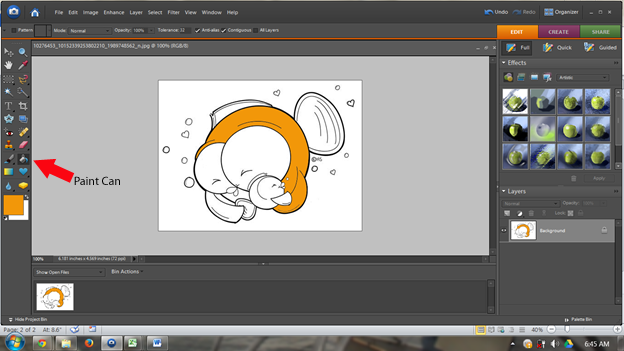
- When you click on the Paint Can, you will see a little paint can as your cursor. Place the tip of the paint anywhere in section you want to color, and click your cursor. As long as the section has no open ends, only that section will take the color. Do this for each part of the fish you want to be in that color.

Ctrl-+ enlarges your image - For small areas, you can enlarge your image by pressing Ctrl-+ (plus). Ctrl-- (minus) decreases the size of your image.
- This allows you to get into smaller areas. If you make a mistake - hitting Ctrl-z immediately afterwards will erase your mistake. Don't like the color after all? Just repeat the same steps with a different color.
- Repeat the steps for each section of your image.
When satisfied, be sure to click SAVE AS . . . to save the image as a JPEG file with a NEW NAME. This way your original image from 2 Cute Ink stays pure and usable over and over again.
Completed Image

I am usually mass producing cards - so after saving my image, I insert the image into a word-processing program. Although I'm using the same image, I don't want all my cards to look the same, so I will usually have six images in my document - all different sizes. Print the document - cut the images - and craft away! Here are the other five cards I made using this same image.
The "Fin-tastic Dad" sentiment is yours free if you leave a comment on my blog (Short on Ideas), request the free sentiment, and leave your e-mail address. Specific questions about using 2 Cute Ink digital images with Photoshop? Feel free to ask those on my blog as well.
The "Fin-tastic Dad" sentiment is yours free if you leave a comment on my blog (Short on Ideas), request the free sentiment, and leave your e-mail address. Specific questions about using 2 Cute Ink digital images with Photoshop? Feel free to ask those on my blog as well.


Huh! I read your whole tutorial and I know I can get a free sentiment now by commenting and leaving my email address which you already know. BTW All these fishy cards are very cute.
ReplyDelete