Showing posts with label home decor. Show all posts

October 21, 2022

Got Pumpkin?

My share today is using an SVG from Heart-Filled Spaces.  This pumpkin is using tan paper and cut with my Eclips.  The leaf and stem are from scraps in my stash.  Finally, I added an LED light available at the Dollar Tree - comes with remote and the recipient can get a variety of looks with all the different colors and functions.

July 9, 2017

OMG!!!

This weekend I have been obsessed with Power Poppy's Power & Spark Challenge.  First, the opportunity to copy a talented Bloomie guilt free!  But Bloomie talent is like potato chips for me - I couldn't copy just one!  So set a goal to CASE something from each talented designer.  I have to admit, the icing on the cake is a generous $50 Power Poppy shopping spree - Power Poppy has the best floral digital images!

So for my third entry, I ventured on to CASE Kathy Jones.  The post that caught my eye was her Little Candle Gift from way back in 2015.  So I may be behind the times - I've seen others stamping on candles - but this could not possibly be a quick project.  Kathy actually gave some extraordinary instructions - no, it could not be that easy!  I'm going to let you visit her blog for her extensive detailed instructions - what Kathy failed to say is that the toughest step in stamping on a candle is finding white tissue paper!  So after driving ten miles, visits to three stores, hours later I return home - and literally five minutes later had this gorgeous candle gift using Power Poppy's Black-Eyed Susan (full disclosure - image was already colored - LOL!)

February 28, 2014

Butterfly Wishes - Day 4

Hello!

I've been featuring cards with butterflies made from scraps. But for today’s card, I wanted to do a bit of something more special for my friend's birthday.. This time I chose to use the Raindrops on Roses paper collection that I won - compliments of Heartfelt Creations. My friend loves vintage - so perfect! And I might have to restate about those scraps, because I dug into this paper collection so quickly and have made many Easter cards and a wedding card for my daughter - I actually pretty much have only scraps left!

Box cards are all the rage now - and I wanted to do something different for my friend, as she sees most of my cards (she sells them for me in her restaurant). And I've been wanting to try to a box card - so perfect timing.

My card did miss something when I was finished....so Martha Stewart's butterfly punch always comes in handy to add a finishing touch.

Enjoy today's card!


What card looks like folded flat to put in envelope


February 20, 2014

Baby Decor

Today's project celebrates babies. This is room decor I made for a coworker when his first baby was born.  It offers a little of everything inspired by babies - sweet flowers, pearls, a globe frame full of memories, and Winnie the Pooh, of course!  This papercraft project makes a great addition to any baby's room.

May 30, 2013

Baby E

Here's a project that has been setting on my desk for eons (like most!)...for my newest cousin.  Absolute fun project to make!!!! (Baby's face blurred to protect the innocent.)


May 17, 2013

Scraps to Treasures - Monochromatic


Welcome to the Scraps To Treasure Team's Monochromatic Blog Hop. Our goal at STT is to use up all our scraps and leftover embellishments to create wonderful layouts, cards and other projects. This month we are doing that using different shades of only one color.

Up for grabs is this RAK from our hostess, Paula at http://preciouspagesbypaula.blogspot.com that will be going out to one lucky hopper that is a follower of all the blogs in the hop and has left a comment for each entry.
Included in the RAK are:

10 My Mind's Eye Laundry Line Diecuts
2 Basic Grey Bling It On Rubons and Rhinestones
2 Glitz Frosting Bling
1 Martha Stewart Glitter Alphas
1 EK Success Inspirables Embellishments
1 Special Moments Embellishments
1 Treasured Memories Metal Tags 

I'm so glad to meet three goals with this project: 1) monochromatic blog hop, 2) finally finding a use for my cream mulberry paper left over from a project I did about seven years ago, and 3) FINALLY finishing one of the baby gifts I've been wanting to make since - what I think the kid is almost 18? Okay - he's still a baby, but I'm embarrassed to not have gotten this gift to his family in the first month.

But I'm excited to share! I think for a project made from scraps turned out just great!


Enjoy the rest of the blog hop and more great monochromatic creations. Your next stop is Robin.  Here is the entire line up in case you get lost.

Paula - http://preciouspagesbypaula.blogspot.com/ 

Melanie - http://afternoonscrapper.blogspot.com/ 
Lissa Marie - www.somanycrafts.com
Robin C. - http://cutonedesignsbyrobin.blogspot.com/
Lucy - http://love2createitall.com
Lynda - http://memoriesintyme.blogspot.com/
Liz - http://tryin2craft.blogspot.com
Camille - http://shortonideasaz.blogspot.com/ (You are here)
Robin L. - http://create-a-latte.blogspot.com/ (Next Stop)

Happy Hopping!

April 11, 2013

Daisy Days - The Robin's Nest Designer Blog Hop

Welcome to The Robin's Nest Designer Blog Hop - Daisy Days! Today we are all sharing projects with a Daisy Theme.

Each designer's blog comes with blog candy! Visit each blog for chances to win a prize "Daisy Package" valued at $15. Each package will include Tear Dew Drops, paper, and embellishments.

One Grand Prize winner will be selected to receive $25 toward purchases at The Robin's Nest online store.

Winners will be posted Sunday, April 21, on The Robin's Nest blog. Be sure to check back to see if you are a lucky winner!

Today I'm sharing a card using Cardstock and Dew Drops from the Robin's Nest.

Supplies Used to Complete this card 


Mat cardstock for frame effect - Gold Classic Glitter on top of Brown Classic Glitter on top of Moss Green Classic Glitter. I added a vertical matted strip on the left - Orange Glitter Crackle, matted with Brown Classic Glitter. The horizontal strip is Getaway Glitter Swirl, also matted with Brown Classic Glitter. The corner die cut is in Brown Classic Glitter.

Daisies are die cut from Orange Crackle Glitter and randomly arranged on the card - with Dew Drop centers, of course. The leaf stamped on Getaway Glitter Swirl add the finishing touch to my daisy patch. Top it off with a sentiment of choice! Finished card size is 5-1/2" x 5-1/2".

Be sure to visit all the designers for a variety of ideas using daisies! Your next stop is Genevive. Links to each designer's blog are below. Enjoy!

March 24, 2013

Teatime Asters

Love Heartfelt Creations Delicate Asters Stamp/Die Set - AND the outstanding Delicate Asters Paper Collection! Here are my first set of cards using both together.  

Step Card - closed ready for mailing
Step Card - Open
 

March 20, 2013

Neon Easter - at The Robin's Nest


Hi Everyone,

We are delighted this month to share ideas using Neon Crackle Cardstock, Mini Dew Drops, and goodies from Epiphany, this month's partner.  With Neon Crackle Cardstock, you will achieve lovely projects for all occasions.  Both my postings feature Easter, as it's that time of year, but this cardstock is perfect for creating sweetheart, friend, and all-occasion cards - especially with all the bright colors, the sky's the limit!  Of course, Neon Crackle Cardstock coordinates well with Neon Mini Dew Drops, adding even more value to your project.

I recently changed jobs and have been participating in store set-up for the past couple weeks ... then sent out of town for additional training.  My cushy life of having five-day weekends has ended.  So when I was thinking about a card design for this week, I could relate to all of you who have crazy lives with careers, family, and other countless responsibilities that take you away from making fancy cards.  So I thought I'd share an incredibly easy Easter card - taking advantage of Robin's Nest elegant supplies in Neon Crackle Cardstock and Mini Dew Drops. 


Supplies Used to Complete this card
I first folded a piece of Pink Crackle Glitter Cardstock in half.  Using an egg template sized to fit a standard envelope, I traced the image on the back of the cardstock (leaving a bit of the folded edge at the left) and cut by hand. I used Word to create an Easter Sentiment and sized that to be 1" to fit in the Epiphany Round 25 charm.


I punched Doily Lace Borders out of Blue Crackle Glitter Cardstock.  The double border is created by gluing two borders edge to edge on the Easter egg.  I covered the "seam" with thin craft tape and covered that with Mini Dew Drops (pink at top and bottom, blue in the middle).

I finished the card off by inserting the Easter sentiment in the Epiphany charm...and adding a white tulle bow.  Quick and Easy!!!  

Be sure to visit The Robin's Nest all month for creative inspiration from our great design team using Neon Crackle Cardstock, Mini Dew Drops, and goodies from our partner, Epiphany!  Remember, all colors of Neon Crackle Cardstock are being featured this month and are 20% Off.

March 15, 2013

Scraps to Treasure Blog Hop - Anything Spring


Welcome to the Scraps to Treasure Blog Hop. This month's theme - Anything Spring.

Nothing says Spring like flowers! Yesterday I received a great Close to My Heart Stamp Set - prize from Janet's Creative World in the Altered Frames Blog Hop last week. The stamp set, Happy Valentine, has gorgeous roses and sentiments to die for (in particular, a great "Smitten"). When I looked at my calendar and saw I needed to get ready for the Spring hop, it was close at hand and perfect! Thanks again, Janet!


My scrap pieces of paper today came from a dollar-store pack purchased seven years ago! ( I remember this, because neither my husband nor I had jobs and no money for the good stuff!) As you know, I seldom throw anything away. And this is why! Today, I just saw this paper in a different way! Here is a pic of the actual paper. I cut the "stripes" and created two borders - one from the flowers and one from the ornate green patterned striped. 

I used scraps of Buttercup Dot (Bo Bunny) for the roses - and I have a folder full of green scraps that I keep mostly for leaves. I stamped and cut two images on green....and two images on Buttercup. I accented the Buttercup roses with Copic Markers - then popped them up on top of the green leaves, adding a couple extra leaves in between.

Kathryn is the next stop on the hop.  But if you came here first, be sure to "spring" through the rest of the hop. The line-up is below in case you need it. My line up may be just a tad off, as I just started working at Hobby Lobby, and am posting my card early as I know I won't have time this weekend while working. We are setting up the first Hobby Lobby in Tucson....and if any of you have experienced a store set up, you know I'm beat when I get home! Yet, even though, have to admit I am enjoying the experience! However, there is no spring in my step these days - so I will be stumbling through the hop! Anyways, hope you are enjoying the hop!


Pam L. ~ http://mzlavr2.blogspot.com/

Robin S. - http://scrapandchat.blogspot.com/
Lissa Marie - www.somanycrafts.com
Robin C -http://cutonedesignsbyrobin.blogspot.com/
Paula - http://preciouspagesbypaula.blogspot.com/
Cicily - www.pinkdalmationscrapper.blogspot.com
Ellen - http://cardmonkeyspaperjungle.com/
Camille - http://shortonideasaz.blogspot.com/
Kathryn - http://creationswithkathryn.blogspot.com

February 27, 2013

Tsunami Rose Challenge Wednesday #9 - Altered Item

I Love Tsunami Rose's Challenge Wednesday.  This week's challenge is an altered item.  My submission is an oldie, but goodie.  Remember back several years, tin cans and lunch boxes were all the fad.  Still have several laying around.  Well, a couple weeks ago, my Stampin' Up friend Paulette gave me one of their new embossing folders.  Companies are getting smarter and making these folders larger...but, alas, it wouldn't fit in my handy dandy embossing folder storage container!  So I pulled out a tin...did my bling thing to it...and I have a new folder storage system.  

Now take a break from your busy schedule, visit Tsunami Rose's Blog, and enjoy all the creativity you'll find there. 


February 22, 2013

Graphic 45 - French Country


Hi Everyone,

Welcome! I am glad you joined me for another addition of fun cards - today from Graphic 45's French Country Collection.  Using these paper packs to make a birthday gift for a friend.  Here are the first several cards I made.

If you're hear from the Pimped-Out Showcase - I look forward to visiting your blog and seeing your grand projects!


February 20, 2013

It's a Card - It's a Present - It's Robin's Nest!

This month we are delighted to feature a fabulous set of creations that showcase Robin's Nest Tear Dew Drops.  If you haven't already done so, be sure to visit all postings in the Robin's Nest Blog to see all kinds of fancy uses for this go-to embellishment.  Along with Tear Dew Drops, we are featuring projects using Modge Podge from this month's partner, Plaid.

When I received my first collection of Tear Dew Drops, each time I poured them in my hand, the solid black tear drops (Piano Tear Dew Drops) would just jump out at me and get my mouth to watering .... for .... WATERMELON!  So I knew I just had to go with the obvious with these Tear Drops - a watermelon-themed card.  


Supplies used to complete the card:
I cut ovals from the Olive (7-3/4" x 5-1/2"), Green (6-1/2" X 4-3/4"), and Red (5-1/2" X 4") Cardstocks.  I folded the Olive oval in half to form a wedge of watermelon.  I cut the Green and Red ovals in half - using the second half of the Green inside for my message and the second half of the Red for another card.  I mixed Modge Podge and Red Dragon Embossing Powder and covered the Red oval with the solution and allowed to dry for maybe 15 minutes.  

I then layered all the oval shapes...and topped the watermelon slice with Solid Black Tear Dew Drops for seeds.  Makes a great picnic invitation with a matted sentiment.  What I think is very fanciful is how the design on the Olive Fleur Cardstock resembles the rind of a watermelon!  (Bet that's not what the artist planned!)

Okay, this entire project took maybe 20-25 minutes - with 3/4 of that just drying time!  So feeling a little guilty for designing such a simple project - and with lots of Tear Dew Drops in glorious colors to use - I decided on a bonus project!

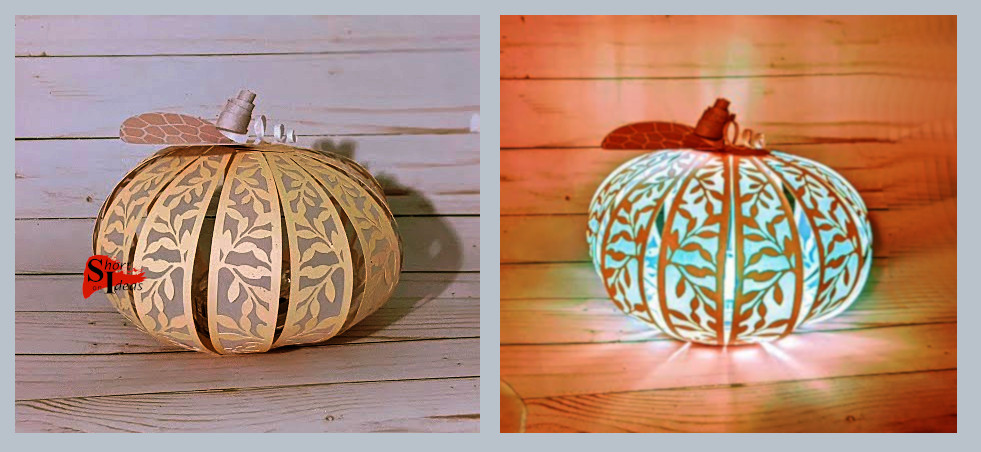
If you've been following my blog at all, you have probably figured out by now that I am addicted to Heartfelt Creations - and that green and purple make up my favorite color combination.  For this project, I was inspired by my SALSA friend, Linda Wilson.  At our last meeting, she shared a tunnel card - turned nightlight.  While I've made several tunnel cards...the idea of using a votive light inside was new to me.  Then as I gazed at all the transparent Tear Dew Drops in my hand...there was that aha! moment.

Here is my second project.
Card Front
Card Inside
Supplies used to complete the card:
The completed card is 5-1/2" x 5-1/2".  I began with two pieces of Plum Glitter Cardstock cut 11" x 5-1/2". I folded one piece in half - PLUM SIDE INSIDE - for the card base.  The other piece is folded in quarters.  Using a Daisy Patch die, I cut three flowers randomly on the two inside quarters of the last piece.  

I glued vellum squares behind each flower hole.  Then glued this piece to the Plum side of the other cardstock - placing glue only on the first and last quarters.  

I then stamped a variety of daisies on the inside - embossing them in silver.  (Remember for overlapping daisies and adding leaves, use a mask to cover any daisies already stamped.)  I randomly added stamped leaves from the Delicate Asters set (love this leaf!) and embossed those in green. 


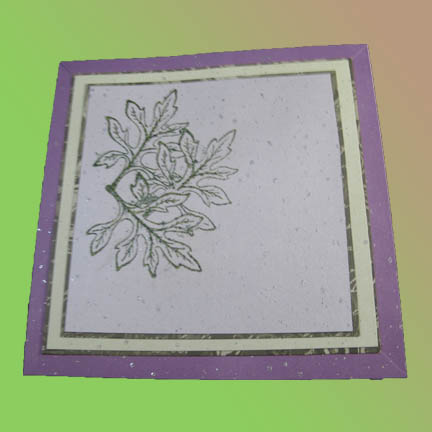
For the front of the card, I randomly stamped and embossed three green leaves on the left side of Silver Glitter Cardstock (4-1/4" x 4-1/4").  

I matted the Silver Glitter Cardstock with Olive Fleur Cardstock - then with Spring Green Glitter Cardstock - then with Olive Fleur Cardstock - lastly with Plum Glitter Cardstock (all glued to the front of the card base, of course).

I used the flowers cut from the inside and three leaves cut from Olive Fleur Cardstock and randomly placed them on the stamped leaves (cut flowers and leaves roughed up to add dimension).  I finished off the front with Neon Purple Mini Dew Drops for flower centers and Rose Hips Tear Dew Drops.  

I also added randomly placed Neon Purple Mini Dew Drops inside the card.  The finishing touch - Rose Hips Tear Dew Drops on the Vellum flower petals to reflect light when used with a battery-operated votive light.


Though the following pictures and video are rough, here is an idea of what the card looks like when lit with a battery-operated votive candle.   

For some reason, I wasn't able to post the video here, but you can view my Facebook video here for an idea of how this looks lit up.

Design your card to match the decor of your friends' homes, and this just may be a card that is never put away!  So visit the Robin's Nest now, as all Tear Dew Drops are being featured this month and are 20% Off.